1/1/11

Marbled Mindblow - Marble Tie Dyeing with Shaving Cream by Moon Dyes


 So a while back I saw a featured artist on Dharmas website who had some way groovy marbled fabrics. I was curious on how she had gotten that marvelous marbled look...so I started to do some research then gave it a bit of a whirl.

Looks easier then it is :)

  First things first: 
You need something to Transform.
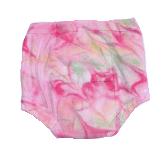
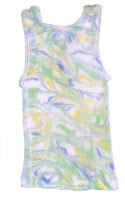
I hand dyed a pair of bamboo socks that are super duper soft & comfy along with a groovy sports bra. I also dyed a pair of cotton training pants & a toddlers tank top for a friend. Pics shown way below.

SHAVING CREAM FUN!

Next:
 Get materials gathered.
I used the shaving cream method.
You will need...
  • Dye Powder &  
  • Urea to mix dyes
  • Soda Ash dye fixer
  • A shallow tray/Lid or Long Storage box as big as the item your marbling
  • Toothpicks, combs or whatever to swirl the dye around
  • Shaving cream, the regular plain white foam kind a few cans if u plan on doing something large or a lot of items.
  • Squeeze Bottles with spouts
  • Funnels
  • Newspaper
  • Bowls

Finally:
Lets start crafting!
You will need to pre soak the fabric items you will be dying in a soda ash bath for 20 minutes at least. Squeeze out & let dry a while, or if you have no patience you can pop it in the dryer until it is just a bit damp. Not too long or your fabric can burn so always pay attention!

*Dye molecules permanently bind with cellulose based fibers (cotton, rayon, hemp, linen), as well as silk, when the pH is raised. Soda ash (sodium carbonate) is generally used to raise the pH and is either added directly to the dye, or in a solution of water in which garments are soaked before dyeing. This way the color doesn't wash out! Yeeeaah

While your waiting for fabric to dry mix your dye powder with the urea. Using a bowl add some shaving cream to it and squirt one of your colored dyes into it. Mix well. You should have a runny but thick mixture. Pour it into a squirt bottle. You may need to snip the tip larger if necessary. Repeat with a different color and so on. Do this quickly for the shaving cream turns watery if your a slow poke!
I live 2 dye...

Now its time to set up your Dye Base.
Use the shallow tray/box/lid. I used a Tupperware lid for the bamboo socks & toddler tank an a small plastic tote for the sports bra. Take a bowl and squirt tons of shaving cream into it, add a little water and Stir it Up. This will be poured on the lid or whatever you are using so make sure its not too runny or thick.

Good Luck!
Gotta Have Base
Pick a few colors and squirt some lines on the white base. Pick another and squirt a few more lines and so on.... leave some white base in between the colored lines or your colors will turn all to muck, I say...YUCK!

Nice and Pretty
Trip-Fantastic

Take a pencil, stick or whatever and do a few fancy swirls to the base with the colored lines on it. Nothing to fancy if its your first time. Posted is some information on ways to swirl if you need some help.

Looks Far Out Man!

Taken from the Dharma Trading Website

 Time to Dye the Goods!
Get the paper towels spread out on plastic or in a tote of some sort that's as big as the item your dyeing. I line a Tupperware tote with them and place the item in the tote. This way I have a lid to keep the item moist which helps with the bonding process. When your ready take your item and place it on the colorfully swirled dye base. Try to set the middle of the item down first then slowly put the rest down on either side. This way you get no air bubbles. If your dying a shirt or something on both sides cut some cardboard wrap it in plastic and place it in between the item. This way you can dye both sides without making a mucky mess. I did not do this step with my first items picture here since this was my first time trying this. My next Marble Dyeing blog post will be improved!
I should of used plastic cardboard

Dyed Item on Paper Towels
Take them off and dye the back.
You may need to re do the dye base if there is no more room. Then lay the item on the paper towel and cover. This is where a tote comes in handy.

The item needs to Bond in a Warm Spot
 Let it sit overnight to bond. Rinse with cold water until the water is clear then wash with Hot water and a nice shot of synthrapol to make sure the colors don't bleed together. It also keeps the white parts white...WOW! I wash it again in cold water to make sure it doesn't dye my clothes next time I wash it.

Dry and wear in pride.
Handmade Rocks!

Bamboo Socks

Cotton Sports Bra

https://www.facebook.com/MoonDyes/photos/a.222505898897.134207.109584053897/430661313897/?https://www.facebook.com/MoonDyes/photos/a.222505898897.134207.109584053897/430661328897/?type=3&theater


Thanks for looking!
Lila Moon


Good Vibes 🌙 Bright Dyes 
www.moondyes.com 
Moon Dyes

Follow @moondyes on: 


12/19/10

Wake Up!

10/4/10

Halloween is Near!


            Cute Newborn Sets available too!


Tag Halloween Party Wrought Iron Pumpkin Stand, 10.625" TallDog Halloween Costume - Pumpkin Pooch Dog Pumpkin Costume - X-Small (XS)


8/27/10

Fashionable Solutions for Special Needs

Susan Kleiman, Owner of Ross Daniel Adaptive Apparel Inc. is a wonderful NY lady who has created a fashionable, fun & easy to put on clothing line for kids & teens with disabilities. Her first line is Cool Socks for kids that wear braces or orthotics on their legs.
We had the honor of tie dying some of them. It was an exciting experience needless to say. At first news of our new custom tie dying journey we were overwhelmed with having 720 pairs of socks to do. That's 720 x 2 socks total mind you. haha but once everything was ready to be shipped to dye it was split up in portions. Phew! So here is where our journey begins...
Package has arrived from RDAA and we cant wait to Open it and check out the fiber that needs to be dyed. Its like meeting someone for the first time. Getting to know your work surface is the best way to start new projects :)

First we wash the whites in hot water to prep the fibers for their cold dye bath. They Love it! Its like a fiber Spa Trip ! Then we spent many long hours tying up each sock to the desired pattern Susan had chosen. We had stripes & crunkle designs to whip up. When you tie designs you can use rubber bands or twine. We have both and use both but it depends on what design your making. I like to use rubber bands with simple designs and twine with small, complex designs. You just need to play around and see what works best for you some times. 
The tricky part was that she had her company logo sewn on the bottom of each sock in light blue cotton thread, and she didn't want dye covering it up of course. We had to fold and dye each sock as careful as we could. Phew! is all I have to say. It was a challenge at times but we learned a few tips and lessons on the way so it was all worth it! Once every sock was tied and soaked in dye fixer we began our colorful journey. We had three different styles to do:
  • Purple Haze (Purple & Hot pink)
  • Woodstock Magic (Red,  Yellow & Bright Green)
  • Hippie Blue (Baby Blue & Brilliant Blue)


The Four20moon Shop Creations 
uses Fiber Reactive dyes for all our dying needs.

used for: 
Tie-Dye, Tub Dyeing, Low Immersion Dyeing, Batik, Dye Painting, Silk Painting, Screen & Block Printing or Stenciling, even Tie-dyeing Silk in a Microwave
Used on:
All natural Fibers (Cotton, Rayon, Hemp, Silk, etc.), Wood, Cane, and Rattan.

We love how bright the dyes come out. 
Super Groovy!


Interested in us dying your next custom order
Drop us an E-Mail and we will make it happen!
Good Vibes & Bright Dyes

7/7/10

Cotton Candy Fun!

Got a RUSH order 5 days before the 4th of July from a groovy family in NY. The 9 year old son was starting a cotton candy stand...and his first job was on the 4th! The Four20moon Etsy shop had a small girls cotton candy style t-shirt for sale that caught the sweet families eyes, and they had to have 4 custom T's made and shipped ASAP. We love custom orders, and were eager to get started to make sure there 4th of July was a hit!

We start by pre-washing the fabric to get any crud off it that could muck up the whole project.
A clean tie-dye canvas is a happy one :)
Then we tie up the fabric to the desired pattern. In this case it was all spiral designed T-shirts. Let your fabric soak in soda ash fixer for 20 mins or so, it depends. I have gaped out and left projects for hours...then some times I only have time to let it soak for 5-10 mins...either way it needs to soak, no quick dip will work properly. The fixer holds the color to the fabric so its a very important step in the process.

When it has soaked in all the fixer goodness u squeeze out excess fixer from each project, which can be reused to soak other far out creations! Now its time to dye.
We used Baby Pink, Baby Blue & New Black for our cotton candy Ts which I think looks very yummy! I like to make sure my dying area is tidy...a dirty area could cause huge issues and very messy unprofessional looking goods. A few drops of the wrong color could mess up your whole creation instantly. Believe us, we know from experience...lol
Good times, bad times its all groovy really!
You never know what your gonna get, most of the time things look awesome no matter what, but when you have custom orders you need to be careful to not alter the vision of what the customer wants. This can be tricky at times but its also a challenge we love to experience. Gets our blood pumping in a good way.

Once the project is dyed let it sit in a container with a lid on it overnight. Usually 12-24 hours produces the most vibrant colors. Heat makes the colors bond with the fabric so be sure to have it in a warm area. If your impatient or need it in a hurry you can tie it up in a plastic bag and microwave it for 4 mins or so. We were so excited to find the microwave method cause well, everyone wants to see there creations ASAP! So this method just blew our minds, but I like waiting for the outcome. I think it produces groovier results personally, while my man likes the microwave method much better. Either way works though so give them both a try and see what you dig more.
Drop me an e-mail with your comments I'd love to hear all about your opinions!
When its time, rinse the projects in cold water to remove loose dye. Rinse until the water is fairly clear removing the ties and such. In the meantime fill up the washer with HOT water and some synthrapol detergent to prevent dye from staining the white areas of your tie-dye.
NOTE:
some colors like red and black will slightly stain the white and may not be fully prevented. It gets a bit crazy when you have a project with those two colors...future blog post in process about this! Uggh
Anyway:

Add your Cold rinsed goods to the Hot washing machine load and wash. I like to wash the goods twice to make sure the colors don't bleed onto your skin or other clothing when you wear them the first time. Stained armpits can be funny when you think about it but maybe not the coolest thing at certain times HA! Dry your tie dyes and Taaa-Daahhh! Super Funk-tastic :) Wear in pride!